Tuesday, October 30, 2018

AMAZING SPINACH SALAD WITH SWEET-SPICY NUTS, APPLES, FETA AND BACON

A plate of spinach salad with chopped nuts, onions slices, bacon, apple slices, and feta on top.

INGREDIENTS:

SALAD:

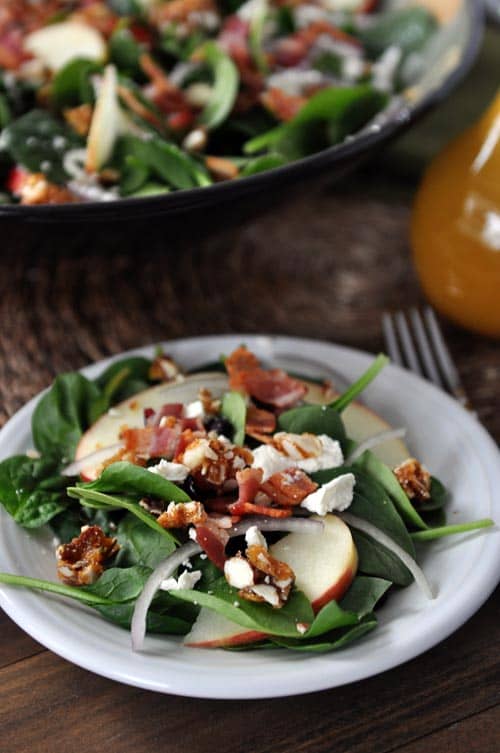
  • 16 ounces baby spinach
  • ½ small red onion, slivered (see note about tempering the onion flavor)
  • 6 slices of applewood smoked bacon, cooked and crumbled or chopped into small pieces
  • 1 cup Feta cheese crumbles, more or less to taste
  • 1 cup dried cranberries or cherries, more or less to taste
  • 1-2 Honey Crisp apples, cored and sliced thin

SWEET SPICY NUTS:

  • 1 cup chopped walnuts or pecans
  • 1/3 cup granulated sugar
  • Pinch of cayenne (more to taste if you want)
  • Pinch of salt

RED WINE VINAIGRETTE:

  • 1/4 cup red wine vinegar
  • 1/2 cup extra virgin olive oil
  • 1 clove of garlic, pressed or finely minced
  • 1-2 teaspoons Dijon mustard
  • 1 teaspoon sugar
  • 1/2 teaspoon salt, more or less to taste
  • Fresh cracked pepper to taste

DIRECTIONS:

  1. For the dressing, shake all the ingredients together in a mason jar until well combined or run them through a quick blender cycle. Store in the refrigerator until ready to serve. The dressing can be made up to a week in advance.
  2. For the nuts, lightly toast the nuts in a 350 degree oven for 8-10 minutes, checking often so they don’t burn. While they toast, place the sugar, cayenne and salt in a skillet over medium-low heat. Cook the sugar mixture until it liquifies completely, adjusting the heat so it doesn’t bubble and burn. Toss in the toasted nuts and stir to coat the nuts with sugar. Let the sugared nuts cool completely.
  3. To assemble the salad, toss all the salad ingredients together along with the cooled nuts. Serve immediately with the vinaigrette alongside. All the components can be measured out/prepped ahead of time and stored separately (I like to soak the apples in a bit of lemon juice in water to help prevent browning). Just toss right before serving. Enjoy!

NOTES:

Kim, who gave me this recipe, alerted me to the most magnificent tip. I love onions but hate the after effects of eating them raw in a salad. To temper the onions a bit, soak the onion slices covered in cold water with a bit of baking soda (I use about 1/2 teaspoon soda). Let them sit for 15-20 minutes then rinse and drain well. Also, in my pictures, disregard the overly yellow color of my vinaigrette. I went a little crazy with the mustard when I made it this time. Yours probably won’t be quite this yellow. Finally, this recipe makes an excellent main dish if served alongside grilled chicken and keep in mind that all the quantities can easily be adapted according to taste. Yum!

Monday, October 15, 2018

BROOKIES {BROWNIE + CHOCOLATE CHIP COOKIES}


INGREDIENTS:

BROWNIE COOKIE BATTER:

  • 10 tablespoons butter, softened
  • 2/3 cup lightly packed brown sugar (5 ounces)
  • 2/3 cup granulated sugar (5 ounces)
  • 1 large egg
  • 1 large egg yolk
  • 1 teaspoon vanilla extract
  • 1 1/4 cups plus 3 tablespoons flour (7.25 ounces)
  • 1/2 cup unsweetened natural cocoa powder (1.5 ounces)
  • 1 teaspoon baking soda
  • 1/4 teaspoon salt

CHOCOLATE CHIP COOKIE BATTER:

  • 10 tablespoons butter, softened
  • 2/3 cup granulated sugar (5 ounces)
  • 2/3 cup light brown sugar (5 ounces)
  • 1 teaspoon vanilla
  • 1 large egg
  • 1 large egg yolk
  • 2 cups plus 2 tablespoons all-purpose flour (about 10.75 ounces)
  • 1 teaspoon baking soda
  • 1/4 teaspoon salt
  • 1 1/4 cup chocolate chips (mini size preferred)

DIRECTIONS:

  1. Preheat the oven to 350 degrees F. Line baking sheets with silpat liners or parchment paper. Set aside.
  2. For the brownie cookie batter, in a medium bowl with a handheld electric mixer (or in the bowl of an electric stand mixer), beat the butter, granulated sugar and brown sugar together until smooth and creamy, 1-2 minutes. Add the egg, yolk and vanilla and beat the mixture for 2-3 minutes until light in color.
  3. In a separate small bowl, whisk together the flour, cocoa, soda and salt. Add the dry ingredients to the batter and mix until combined. Cover and refrigerate while making the chocolate chip cookie batter.
  4. For the chocolate chip cookie batter, in the bowl of an electric stand mixer or with a handheld electric mixer, cream together the butter, granulated sugar, and brown sugar until smooth, 1-2 minutes.
  5. Blend in the egg, egg yolk and vanilla, mixing for 2-3 minutes until the batter is very light in color. In a separate small bowl (you can use the same one as the brownie batter dry ingredients), whisk together the flour, baking soda, and salt. Add the dry ingredients to the batter with the chocolate chips and mix until no dry streaks remain and the chocolate chips are evenly distributed.
  6. Portion both sets of dough into about 4 dozen equal pieces; they will be small teaspoon or so sized balls (if you want to be super precise, I weigh about .5 ounce balls for the brownie batter and .65 ounce balls for the chocolate chip cookie batter).
  7. Grabbing one chocolate chip cookie ball and one brownie batter ball, press them together and use your hands to gently form into a cookie shape, flattening and turning to smooth the edges and form a flattish but still thick cookie shape; they’ll spread out while baking. See the simple picture tutorial below the recipe, if needed.
  8. Bake the cookies on the prepared baking sheets for 8-10 minutes. Don’t overbake or they will be dry and crunchy – underbake just slightly for a soft, chewy texture. It’s ok if the chocolate side crackles just a bit. Remove from the oven and let the cookies cool on the pan for 1-2 minutes before scooping onto a cooling rack to cool completely.

NOTES:

As mentioned in the post above, I have completely revamped this recipe to make it foolproof thanks to many of you leaving feedback that the cookies weren’t turning out right. I have also added weight measurements for those that like to be ultra-precise (let’s start a support group together, shall we?). The cookies are still soft, chewy and completely delicious and dare I say even better than the first iteration of the recipe. Thanks for your patience and for all your comments to help me troubleshoot the recipe.
A note about measuring the dry ingredients – if you aren’t using a scale to weigh the ingredients, measure with a light hand. I fluff the flour before scooping and leveling the cup but you may want to spoon in the flour/cocoa powder and leveling off that way. It doesn’t take much flour to get five ounces in a cup which is what I use as my general standard and what I go by when developing a recipe.
And last thing, if you generally end up with flat cookies (more flat than you want), it may be due to how you measure the flour (see the note above), overly soft butter (make sure it is just at room temperature) and/or high altitude (consider adding a tablespoon or two extra flour to the cookie doughs as that sometimes help high altitude cookie making). These cookies aren’t overly thick but they shouldn’t be super flat either – nice, soft and chewy, that’s what you are after.

CHOCOLATE CHIP COOKIES

Perfect Chocolate Chip Cookies

INGREDIENTS:

  • 2 1/8 cups all-purpose flour (about 10 1/2 ounces)
  • 1/2 teaspoon table salt
  • 1/2 teaspoon baking soda
  • 12 tablespoons (1 1/2 sticks) butter, melted and cooled slightly
  • 1 cup packed light brown sugar (7 ounces)
  • 1/2 cup granulated sugar (3 1/2 ounces)
  • 1 large egg
  • 1 large egg yolk
  • 2 teaspoons vanilla
  • 2 cups (12 ounces) semisweet or milk chocolate chips

DIRECTIONS:

  1. Preheat oven to 350 degrees. Make sure an oven rack is in the center of the oven.
  2. In a medium bowl, combine the flour, salt, and baking soda. Set aside.
  3. Either by hand or with an electric mixer, cream the butter and sugars together until well mixed. Add the egg, yolk, and vanilla. Mix well until the batter has lightened slightly in color, about 2 minutes. Add the dry ingredients and chocolate chips at the same time. Mix until all the dry ingredients are incorporated.
  4. Form dough into tablespoonful-sized balls and place on parchment or silpat-lined cookie sheets. Frozen cookie dough can be stored for up to 2 months in the freezer.
  5. Bake the cookies for 10-12 minutes until the edges are set and just lightly browned (keeping in mind that ovens can vary in temperature so use your best judgment). Don’t overbake or else the cookies will be tough and hard. If baking frozen cookie dough, add 1 to 2 minutes onto the baking time. Store the baked cookies in an airtight container (or baked cookies can be frozen in an airtight container for up to 2 months).

NOTES:

I’ve had great success baking these cookies at 325 degrees for 13-ish minutes or 350 degrees for about 11 minutes (each oven will vary in time). Basically, do what you have the time and patience for. I usually stick with 350 because it is easier to remember and two minutes faster. Time is money, right??

CHICKEN AND DUMPLINGS


yield: SERVES 6

prep time: 30 MINUTES 

cook time: 2 HOURS
total time: 2 HOURS 30 MINUTES 

INGREDIENTS:

FOR THE SOUP:

  • 4 pounds bone-in-skin-on chicken parts
  • Kosher salt and freshly ground black pepper
  • 4 tablespoons vegetable oil
  • 1 bay leaf
  • 2 thyme sprigs, or 1/2 teaspoon dried thyme
  • 1 rosemary sprig, or 1/2 teaspoon dried rosemary
  • 3 tablespoons butter
  • 1 large onion, cut into 1/2-inch dice
  • 2 large carrots, cut into 1/2-inch dice
  • 2 celery stalks, cut into 1/2-inch dice
  • 1/4 cup all-purpose flour
  • 1 large potato, peeled and diced
  • 1/4 cup heavy cream (optional)

FOR THE DUMPLINGS:

  • 1 large egg
  • 2 tablespoons milk
  • 2 tablespoons butter, melted
  • 1 cup all-purpose flour
  • 2 teaspoons baking powder
  • 1/4 teaspoon kosher salt
  • Italian parsley, chopped, for garnish (optional)

DIRECTIONS:


  1. Make the Soup-Pat the chicken dry with paper towels and season generously with salt and pepper. In a large Dutch oven, heat 2 tablespoons of the oil over medium-high heat. Working in two batches, brown the chicken until golden, about 4 minutes per side. If the pot is looking a little dark on the bottom, splash some water and scrape up any browned bits between batches, and keep those juices with the chicken.
  2. Return all the chicken to the pot and add 8 cups water, the bay leaf, thyme, rosemary, and 1 tablespoon salt. Bring to a boil, reduce the heat to a gentle simmer, and cook for 1 hour.
  3. Strain the broth through a colander set over a large bowl (there should be about 8 cups liquid; skim off some of the fat if you want). Discard the bay leaf and herb sprigs. Using two forks or a pair of tongs, pick the chicken meat off the bones (discard the bones and skin and set aside).
  4. In the same Dutch oven, heat the remaining 2 tablespoons oil and the butter over medium-high heat. Add the onion, carrots, and celery and cook, stirring, until the carrots begin to soften, about 6 minutes. Add the flour and cook, stirring, until all the flour has been absorbed and darkens a bit, about 5 minutes. Add the strained broth, the chicken meat, and the potato, bring to a boil, then reduce the heat and simmer until the broth thickens, about 20 minutes. Stir in the cream, if using. Season to taste with salt and pepper.
  5. While the broth simmers, make the dumpling dough-In a small bowl, whisk together the egg, milk, and melted butter. In a large bowl, whisk together the flour, baking powder, and salt. Pour the wet ingredients into the flour mixture and stir gently with a fork until just incorporated (the batter will be thick; don’t overmix, which could toughen the proceedings). Spoon 1 tablespoon of the batter and use a second spoon to push it off into the simmering soup. Repeat with the rest of the dough. Cover and cook until the dumplings are fluffy and tender, about 15 minutes.
  6. Divide the soup and dumplings among bowls. Garnish with parsley and enjoy!
Recipe from Cravings: Hungry for More by Chrissy Teigen