Showing posts with label TRY. Show all posts

Thursday, December 30, 2021

CAFE ZUPAS PUMPKIN CHORIZO SOUP

YIELD: 8

Pumpkin Chorizo Soup

pumpkin chorizo soup with toppings

Hearty and creamy pumpkin soup full of beans, tomatoes, and corn. 

PREP TIME10 minutes
COOK TIME30 minutes
TOTAL TIME40 minutes

Ingredients

  • 1/2 pound chorizo sausage, casings removed 
  • 1 tablespoon olive oil
  • 1 onion, diced
  • 2 cloves garlic, chopped
  • 1 teaspoon cumin
  • 2 cups chicken broth
  • 2 cups pumpkin puree or 1 (15 ounce) can pumpkin puree
  • 1 (15 ounce) can black beans
  • 1 (15 ounce) can diced tomatoes
  • 1 (15 ounce) can corn 
  • 1/2 teaspoon oregano
  • salt and pepper to taste

Instructions

    1. Cook the chorizo by gently breaking it apart in a large sauce pan over medium-high heat, about 7-10 minutes. Remove chorizo.

    2. Add the oil and onion (alternatively, leave a tablespoon of chorizo fat and omit oil) saute until tender, about 4 minutes.

    3. Add the garlic and cumin and saute until fragrant, about a minute. 

    4. Add the chorizo, broth, pumpkin puree, drained black beans, drained corn, diced tomatoes, and oregano, bring to a boil, reduce the heat and simmer for 10 minutes. 

    5. Season with salt and pepper. Add garnishes.

Notes

Sour cream, cheese, pepitas, and tortilla chips are all really great topping for this soup. If it's too thick add up to one more cup broth.

Wednesday, December 9, 2020

COCONUT LIME WHITE CHICKEN CHILI

Coconut Lime White Chicken Chili


Coconut Lime White Chicken Chili

Coconut Lime White Chicken Chili

  • Yield: 4 1x

Description

An easy and delicious white chicken chili that can be made in the slow cooker or the Instant Pot.


SCALE

Ingredients

  • 3 boneless, skinless chicken breasts
  • 1 (13.5 ounce) can coconut milk
  • 1 (12 ounce) jar salsa verde
  • 2 (14 ounce) cans white beans, rinsed and drained
  • 2 cups frozen corn
  • 1 (4 ounce) can diced green chilies
  • 1 1/2 teaspoons cumin
  • 1 teaspoon garlic powder
  • 1 teaspoon salt
  • 1 lime
  • diced avocado and/or tortilla chips for topping ((optional))

Instructions

FOR THE INSTANT POT:

  1. Place everything up through the salt into the instant pot, seal, and cook on high pressure for 12 minutes.
  2. Let natural release for 10 minutes then remove chicken, shred, and return to pot. Stir together and add a squeeze of fresh lime juice. Serve as is or with avocado and chips.

FOR THE SLOW COOKER:

  1. Place everything up through the salt into the slow cooker and cook on low for 4-6 hours (or high for 2-4).
  2. Remove chicken, shred, and return to the slow cooker. Stir together and add a squeeze of fresh lime juice. Serve as is or with avocado and chips.

Notes

*Recipe inspired by Kristy Denney


Sunday, November 29, 2020

PUMPKIN ROLL

PUMPKIN ROLL

  •  prep time: 20 MINUTES
  •  
  •  cook time: 15 MINUTES
  •  total time: 35 MINUTES
  •  
  •  yield: 0 ABOUT 8-10 SERVINGS 1X

DESCRIPTION

This classic pumpkin roll recipe is made with a delicious pumpkin cake and heavenly cream cheese filling…and it’s surprisingly easy to make.  See the video above for a step-by-step visual tutorial for how to assemble your roll.


SCALE 

INGREDIENTS

PUMPKIN CAKE INGREDIENTS:

  • 3/4 cup all-purpose flour
  • 1/2 teaspoon baking powder
  • 1/2 teaspoon baking soda
  • 2 teaspoonpumpkin pie spice (*or see below for substitution)
  • 1/4 teaspoon salt
  • 3 large eggs
  • 1 teaspoon vanilla extract
  • 1 cup granulated sugar
  • 2/3 cup pumpkin puree
  • optional: powdered sugar (to sprinkle on at the end!)

CREAM CHEESE FILLING INGREDIENTS:

  • 1 (8 ounce) brick cream cheese, room temperature
  • 1 cup powdered sugar, sifted
  • 6 tablespoons butter, softened
  • 1 teaspoon vanilla extract

INSTRUCTIONS

TO MAKE THE PUMPKIN ROLL:

  • Preheat oven to 375° F.  Line a 15 x 10-inch jelly roll pan with parchment paper, leaving an extra 1-inch of parchment sticking up on both 15-inch sides of the pan so that you can easily lift the cake out after baking.  (If you’d like the parchment to stick to the bottom of the pan more easily, sprinkle a little bit of water on the pan and then press the parchment paper on top of it.  You can also lightly mist the top of the parchment paper with cooking spray for easier cake release afterwards, although it’s not required.)

  • Whisk together flour, baking powder, baking soda, pumpkin pie spice and salt in a large mixing bowl until combined.

  • In a separate bowl, whisk eggs and granulated sugar for 1 minute until thick. Add in the vanilla and pumpkin, and whisk until just combined. Fold in the flour mixture with a rubber spatula, and stir together until just combined.

  • Spread the batter evenly into prepared pan.  Bake for 13 to 15 minutes, or until top of cake springs back when touched. Carefully lift the parchment paper and cake out onto a flat (and heat-safe) surface.  Then slowly, use your hands to roll the cake — rolling from the short end to the short end — until it is completely rolled up.  Transfer the cake roll to a wire rack, and cool until it reaches room temperature.

  • While the cake is cooling, make the cream cheese filling (see below).

  • Once the cake has reached room temperature, transfer the cake roll to a flat surface, and carefully it until it is flat again (or mostly flat, it’s ok if the ends curl up a bit). Spread the cream cheese mixture evenly over cake, leaving a 3/4-inch border on all sides.  Then carefully re-roll the cake, gently peeling away the parchment paper as you roll until you can completely remove and discard it. Tightly wrap the pumpkin roll in plastic wrap and refrigerate at least one hour.

  • Remove and unwrap the pumpkin roll and transfer it to your serving dish. Lightly dust the pumpkin roll on all sides with powdered sugar, if you would like.  Then slice* and serve.

  • If you have leftovers, just re-wrap the pumpkin roll in plastic wrap and store in the refrigerator for up to 5 days.  Or freeze for up to 3 months.

TO MAKE THE CREAM CHEESE FILLING:

  • Whisk together cream cheese, powdered sugar, butter and vanilla extract in a mixing bowl until smooth. If the filling is too thin, add more powdered sugar. If it is too thick, add a half teaspoon or two of water.  (You want a medium consistency so that the filling is easy to spread, but not too warm or thin that it will ooze out of the cake when you’re rolling it up.)

HOW TO STORE + FREEZE A PUMPKIN ROLL:

Great news!  Pumpkin rolls keep well in the refrigerator and freezer, so they’re the perfect dessert to make ahead of time if you’d like.  To store your pumpkin roll, wrap it up tightly in plastic wrap.  Then you can either refrigerate it for up to 5 days, or freeze for up to 3 months.  If you choose to freeze the pumpkin roll, be sure to let it thaw in the refrigerator for 1 day before serving.  (If you try to warm it up in the microwave or oven, it can dry out.)

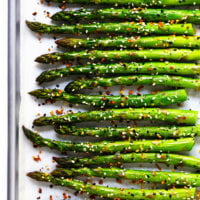
“EVERYTHING” ROASTED ASPARAGUS

Everything Roasted Asparagus

“EVERYTHING” ROASTED ASPARAGUS

  •  prep time: 3 MINUTES
  •  
  •  cook time: 9 MINUTES
  •  
  •  total time: 12 MINUTES
  •  yield: 4 SERVINGS 

DESCRIPTION

Kick your roasted asparagus up a notch with some everything bagel seasoning!  Feel free to sprinkle on as much as you’d like.


INGREDIENTS

  • 1 pound fresh asparagus, ends trimmed*
  • 1 tablespoon olive oil
  • 1 tablespoon everything bagel seasoning, or more/less to taste
  • fine sea salt

INSTRUCTIONS

  1. Heat oven to 425°F.  Line a baking sheet with parchment paper.
  2. Place the asparagus on the baking sheet and drizzle evenly with the olive oil.  Toss briefly so that the asparagus are evenly coated in the oil.  Then arrange them back out in an even layer, and sprinkle evenly with the everything bagel seasoning.
  3. Bake for 10-15 minutes, or until the asparagus reach your desired level of tenderness.
  4. Taste and season with extra salt if needed.

NOTES

*To find out where the ends need to be trimmed off, just give your asparagus a good bend and the woody part at the bottom will snap off.

Thursday, November 12, 2020

HOMEMADE CRUNCH WRAP SUPREME

 Homemade Crunch Wrap Supreme - A complete copycat version from Taco Bell! Except completely homemade and made so much more healthier! Get your fix now!


Beans, pulled pork, cheese, tostada, lettuce, tomato and sour cream, wrap it all up in a little gift package of a flu tortilla


HOMEMADE CRUNCH WRAP SUPREME

A complete copycat version from Taco Bell! Except completely homemade and made so much more healthier! Get your fix now!

INGREDIENTS:

  • 2 tablespoons olive oil, divided
  • 1 pound ground beef
  • 1 (1.25-ounce) package taco seasoning
  • 4 (12-inch) flour tortillas
  • 1/2 cup nacho cheese
  • 4 tostada shells
  • 1/2 cup sour cream
  • 2 cups shredded lettuce
  • 1 Roma tomato, diced
  • 1 cup shredded Mexican blend cheese

DIRECTIONS:

  1. Heat 1 tablespoon olive oil in a large skillet over medium high heat. Add ground beef and cook until beef has browned, about 3-5 minutes, making sure to crumble the beef as it cooks; stir in taco seasoning. Drain excess fat; set aside.
  2. Heat tortillas according to package instructions.
  3. Heat nacho cheese according to package instructions.
  4. Working one at a time, place ground beef mixture in the center of each tortilla. Top with nacho cheese and tostada shell. Spread sour cream in an even layer over the tostada shell; top with lettuce, tomato and cheese. Repeat with remaining tortillas.
  5. Fold the edges up and over the center. Continue to work your way around the tortilla, folding as tight as possible.
  6. Heat remaining 1 tablespoon olive oil in a large skillet. Place wrap seam-side down and cook until the underside is golden brown, about 2 minutes. Flip and cook wrap on the other side, about 1-2 minutes longer.
  7. Serve immediately.


Pop Tart Gingerbread House

SUPPLIES

You’ll need 6 pop tarts. I used strawberry because it already had red and green sprinkles on the frosting.

You’ll also need a variety of holiday candies and royal icing.

EASY ROYAL ICING FOR FROSTING GINGERBREAD HOUSES

  • 1/2 cup powdered sugar
  • 2-3 teaspoon water

Mix sugar and water together until it reaches the consistency of craft glue. You don’t want it to be too runny.

GINGERBREAD HOUSE CANDIES

We all have our favorite holiday candies to use for gingerbread houses. My go-to candies are mints and chocolate candies in holiday shapes—like Santa, trees or snowmen.
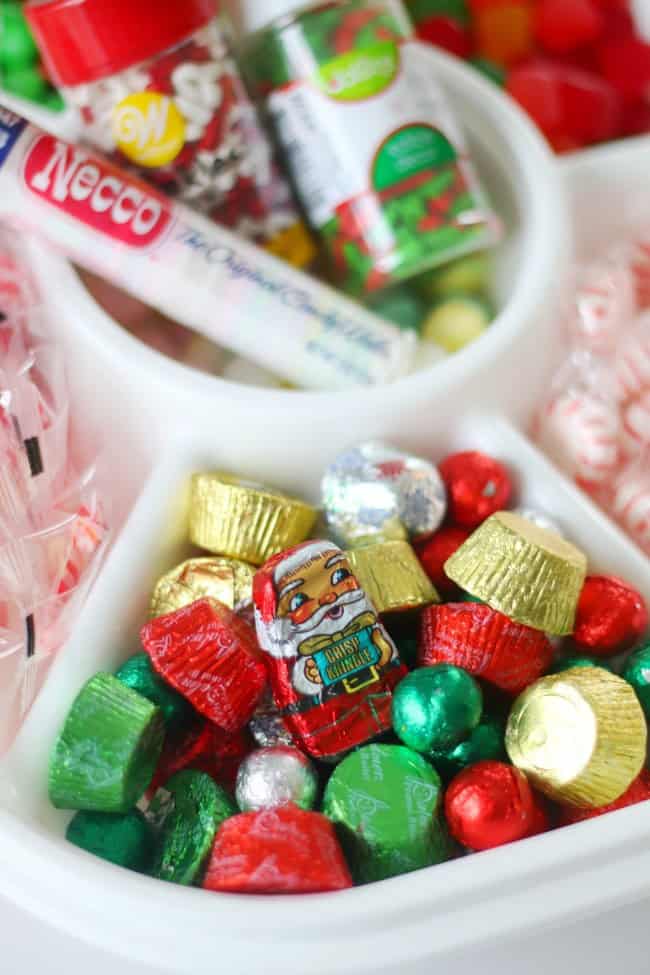
chocolate santa candy

TIPS FOR ASSEMBLING POP TART GINGERBREAD HOUSE

  • Follow my instructions at the end of the post for cutting your pop tarts. ONLY USE A SERRATED KNIFE to cut the pop tarts. A paring knife will not work. Gently saw as you cut and you’ll end up with nice clean lines.
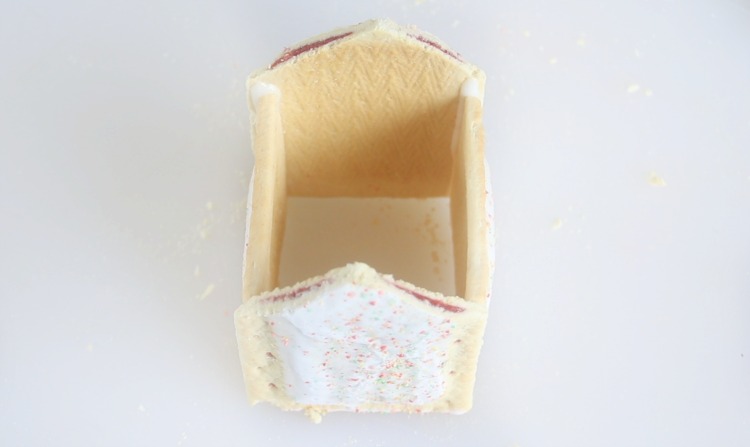
  • Add a bead of icing to the pop tarts and use your hands to hold the 4 walls into place for a minute or two. After that, the icing is tacky and will hold it on its own.
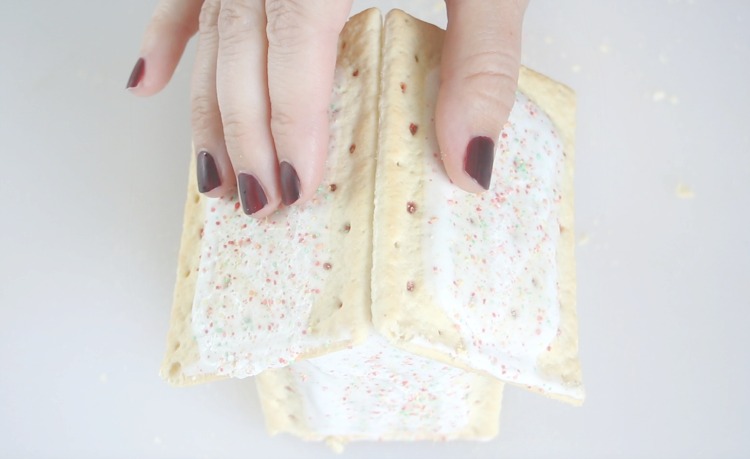
  • Repeat for the roof, holding it in place for a minute or so before letting go.

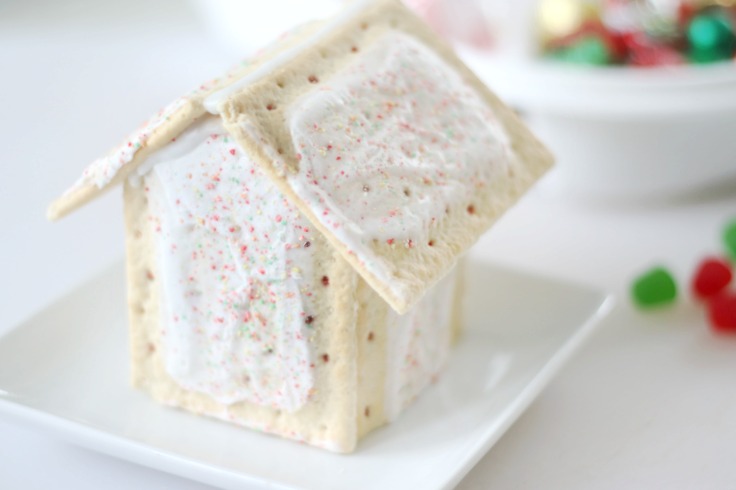
These houses are pretty sturdy once the royal icing has had a chance to set. This takes about 15-20 minutes. Not bad.

If you do this you shouldn’t have any issues with your house falling apart.

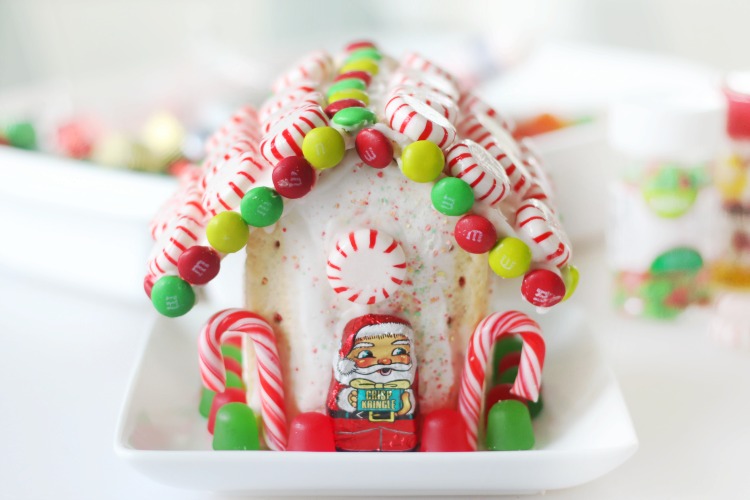
pop tart gingerbread house decorated with candy

TIPS FOR ICING AND DECORATING POP TART HOUSE

Make sure to watch our video to see how we assembled and decorated our house.

Obviously lightweight candies like Necco wafers are easier to work with than M&Ms and starlight mints, but don’t let that stop you. I’ll share a few tips for working with heavier candy. That being said, if you are making these with a group of children, I’d go for lightweight candy and sprinkles to avoid little ones getting frustrated. I’d also suggest assembling the houses about an hour before decorating them so that they are ready to go!

  • To add heavier candies to the trim (see M&Ms in photo):
    • Add a bead of royal icing to the house and let it sit for a couple of minutes before adding candy. This allows the icing to begin to get tacky. Add the candy, then adjust as necessary if you see any drooping. The icing will harden and hold everything after 10 minutes or so.
  • To add heavy candies to the roof, you have two options:
    • 1: Decorate the roof pieces before assembling the house and let them dry. Then assemble the house.
    • 2: Use the tip above for heavier candies, adding a bead of icing, let it sit for a minute or two, then adding the candy and adjusting as necessary until it is firm.
  • Decorating the walls:
    • If you’re only adding a couple of items (like I did) you can add them at the end. Easy.
    • If you’d like to add a bit of decoration to the walls of your house you can do that BEFORE assembling the house. Let it set up and dry then build your house. This is an easy way to make sure gravity doesn’t pull the candy down.

POP TART GINGERBREAD HOUSE TUTORIAL

pop tart house with candy and frosting

Pop Tart Gingerbread House

This pop tart gingerbread house is so fun to decorate and perfect for the holidays! Once you make a gingerbread house out of pop tarts you'll never go back to graham crackers again. I'll share tips and tricks for decorating your gingerbread house with candy and royal icing. 
4.84 from 6 votes
 Print  Pin  Rate
Prep Time: 20 minutes
Cook Time: 45 minutes
Total Time: 1 hour 5 minutes
 
Servings:  house
 
Calories: 1300kcal
Cost: $5

EQUIPMENT

  • serrated knife
  • plastic sandwich bag

INGREDIENTS

  • 6 pop tarts
  • 1/2 cup powdered sugar
  • 2-3 teaspoons water
  • INSTRUCTIONS

    • Place 6 pop tarts on the cutting board.

    Roof

    • You will be making cuts on 4 out of 6 of the pop tarts. The 2 that aren't cut are the roof pieces. You can set those 2 pop tarts to the side if you'd like.

    Front and Back Walls

    • Take 1 pop tart and place it on its side, right next to another pop tart.
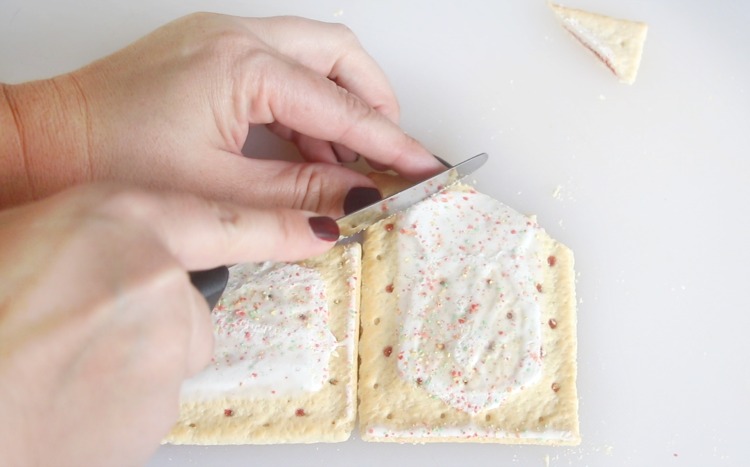
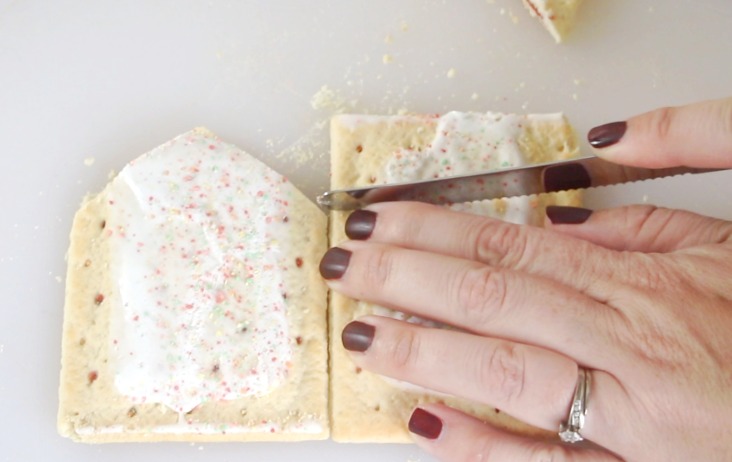
    • Cut on a diagonal from the corner of the pop tart that it on its side, to the center of the middle pop tart. Repeat on the other side.
      pop tarts being cut with serrated knife
    • You should now have a pop tart that looks like a house. Repeat this step so that you have 2 house-shaped pop tarts.

    Side Walls

    • Remember that pop tart that you turned on its side? Go ahead and stand it up again. Place it next to one of the house-shaped pop tarts, lining up the corners, and cut horizontally across. Repeat.
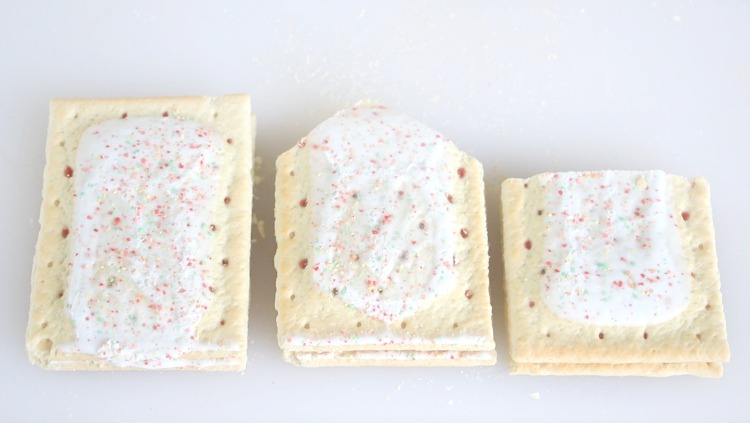
    • You should now have two roof pieces (un-cut), 2 house-shaped pieces, and 2 wall pieces. 
      pop tarts cut into gingerbread house shapes
    • Combine powdered sugar and water to make a royal icing glue. Add water 1/2 teaspoon at a time until desired consistency is achieved (2 1/2 teaspoons works well for me). Spoon icing into a Ziploc bag and cut the tip off. Glue the 4 walls together with icing and hold in place for 30-45 seconds.
      pop tarts held together with royal icing
    • Add the roof pieces and hold in place for 30-45 seconds.
    • Let houses stand 15-20 minutes before decorating.
      pop tarts frosted together to look like a house
    • Dip decorations into icing or pipe icing onto houses to decorate.
      pop tart house with candy and frosting

    NOTES

    • Icing should be the consistency of craft glue.
    • When cutting pop tarts, use a serrated knife and gently saw. Don't press down hard with the knife.
    • To add heavier candies to the houses, like M&Ms, add a line of icing to the house and let the icing stand for a couple of minutes before placing the candy on it. This will allow the icing to dry a little and become tacky. 
    • You may need to hold the candy in place, or readjust the candy that starts to move as you wait for the icing to dry.

    NUTRITION