Thursday, November 12, 2020

Pop Tart Gingerbread House

SUPPLIES

You’ll need 6 pop tarts. I used strawberry because it already had red and green sprinkles on the frosting.

You’ll also need a variety of holiday candies and royal icing.

EASY ROYAL ICING FOR FROSTING GINGERBREAD HOUSES

  • 1/2 cup powdered sugar
  • 2-3 teaspoon water

Mix sugar and water together until it reaches the consistency of craft glue. You don’t want it to be too runny.

GINGERBREAD HOUSE CANDIES

We all have our favorite holiday candies to use for gingerbread houses. My go-to candies are mints and chocolate candies in holiday shapes—like Santa, trees or snowmen.
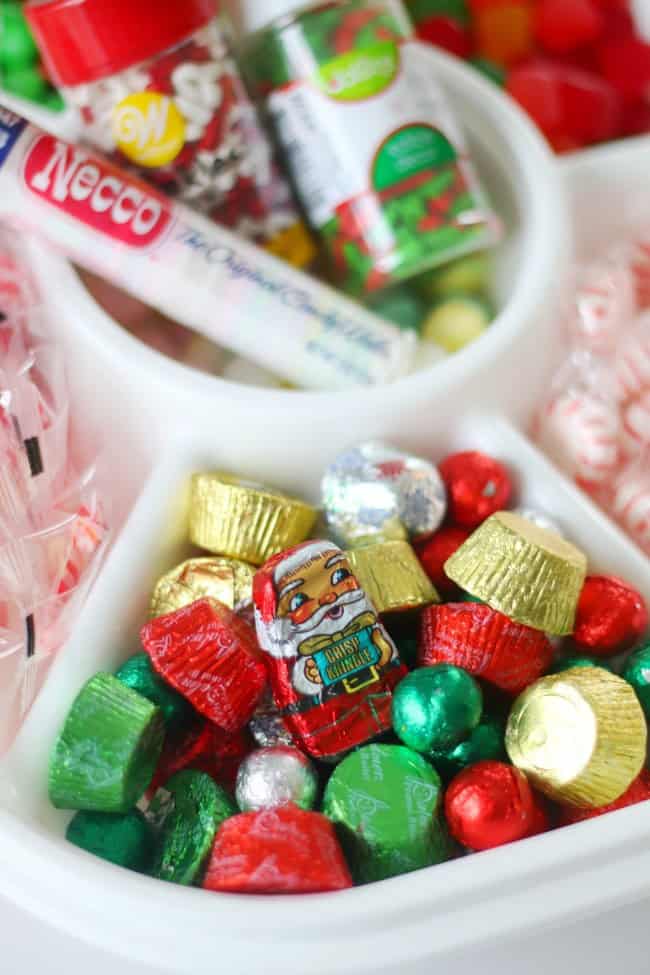
chocolate santa candy

TIPS FOR ASSEMBLING POP TART GINGERBREAD HOUSE

  • Follow my instructions at the end of the post for cutting your pop tarts. ONLY USE A SERRATED KNIFE to cut the pop tarts. A paring knife will not work. Gently saw as you cut and you’ll end up with nice clean lines.
  • Add a bead of icing to the pop tarts and use your hands to hold the 4 walls into place for a minute or two. After that, the icing is tacky and will hold it on its own.
  • Repeat for the roof, holding it in place for a minute or so before letting go.

These houses are pretty sturdy once the royal icing has had a chance to set. This takes about 15-20 minutes. Not bad.

If you do this you shouldn’t have any issues with your house falling apart.
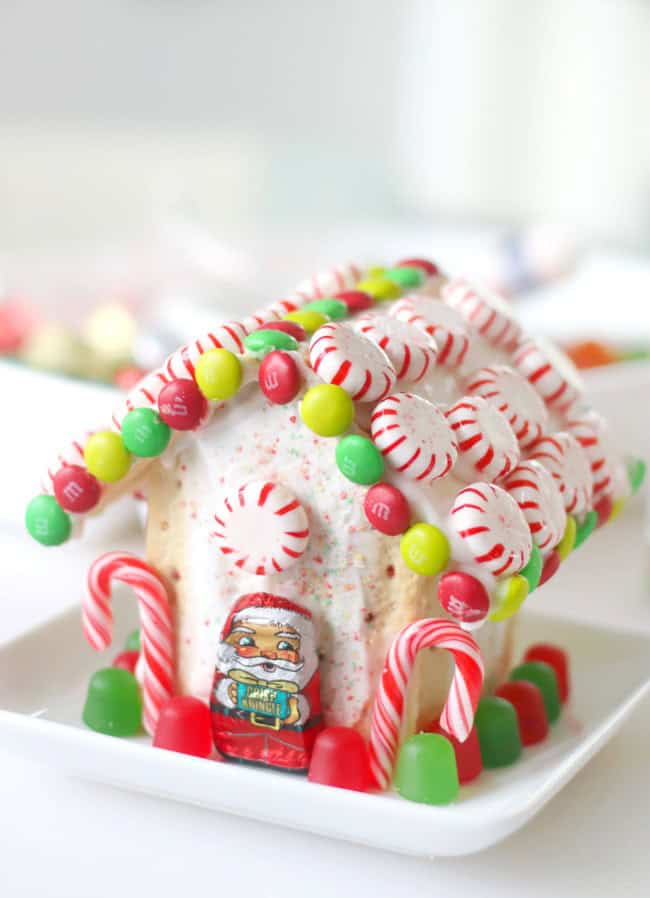
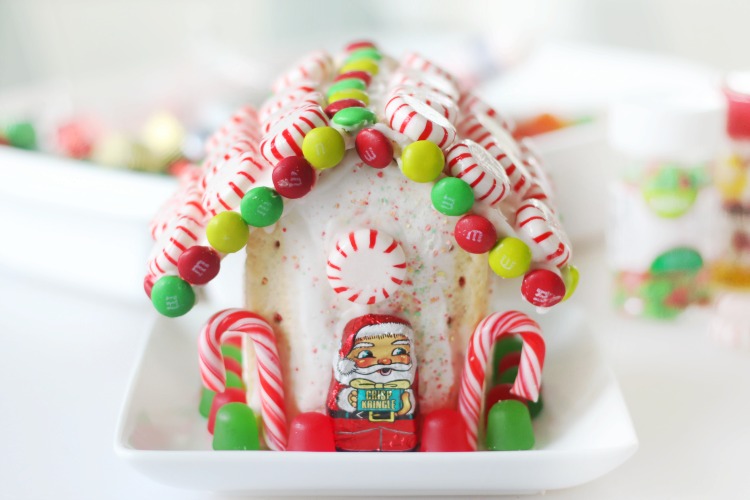
pop tart gingerbread house decorated with candy

TIPS FOR ICING AND DECORATING POP TART HOUSE

Make sure to watch our video to see how we assembled and decorated our house.

Obviously lightweight candies like Necco wafers are easier to work with than M&Ms and starlight mints, but don’t let that stop you. I’ll share a few tips for working with heavier candy. That being said, if you are making these with a group of children, I’d go for lightweight candy and sprinkles to avoid little ones getting frustrated. I’d also suggest assembling the houses about an hour before decorating them so that they are ready to go!

  • To add heavier candies to the trim (see M&Ms in photo):
    • Add a bead of royal icing to the house and let it sit for a couple of minutes before adding candy. This allows the icing to begin to get tacky. Add the candy, then adjust as necessary if you see any drooping. The icing will harden and hold everything after 10 minutes or so.
  • To add heavy candies to the roof, you have two options:
    • 1: Decorate the roof pieces before assembling the house and let them dry. Then assemble the house.
    • 2: Use the tip above for heavier candies, adding a bead of icing, let it sit for a minute or two, then adding the candy and adjusting as necessary until it is firm.
  • Decorating the walls:
    • If you’re only adding a couple of items (like I did) you can add them at the end. Easy.
    • If you’d like to add a bit of decoration to the walls of your house you can do that BEFORE assembling the house. Let it set up and dry then build your house. This is an easy way to make sure gravity doesn’t pull the candy down.

POP TART GINGERBREAD HOUSE TUTORIAL

pop tart house with candy and frosting

Pop Tart Gingerbread House

This pop tart gingerbread house is so fun to decorate and perfect for the holidays! Once you make a gingerbread house out of pop tarts you'll never go back to graham crackers again. I'll share tips and tricks for decorating your gingerbread house with candy and royal icing. 
4.84 from 6 votes
 Print  Pin  Rate
Prep Time: 20 minutes
Cook Time: 45 minutes
Total Time: 1 hour 5 minutes
 
Servings:  house
 
Calories: 1300kcal
Cost: $5

EQUIPMENT

  • serrated knife
  • plastic sandwich bag

INGREDIENTS

  • 6 pop tarts
  • 1/2 cup powdered sugar
  • 2-3 teaspoons water
  • INSTRUCTIONS

    • Place 6 pop tarts on the cutting board.

    Roof

    • You will be making cuts on 4 out of 6 of the pop tarts. The 2 that aren't cut are the roof pieces. You can set those 2 pop tarts to the side if you'd like.

    Front and Back Walls

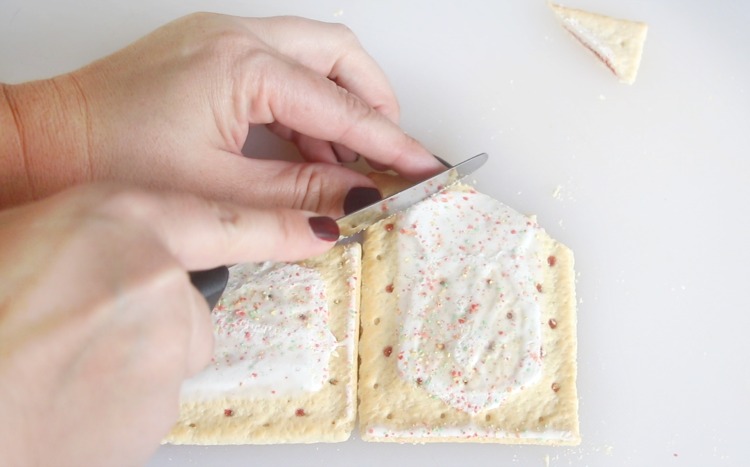
    • Take 1 pop tart and place it on its side, right next to another pop tart.
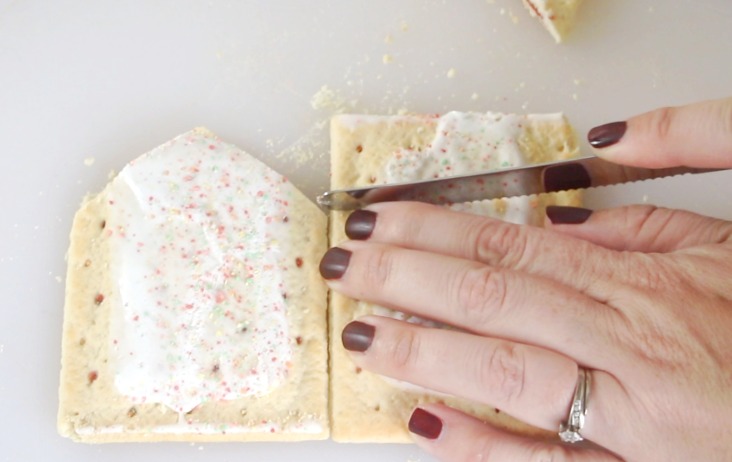
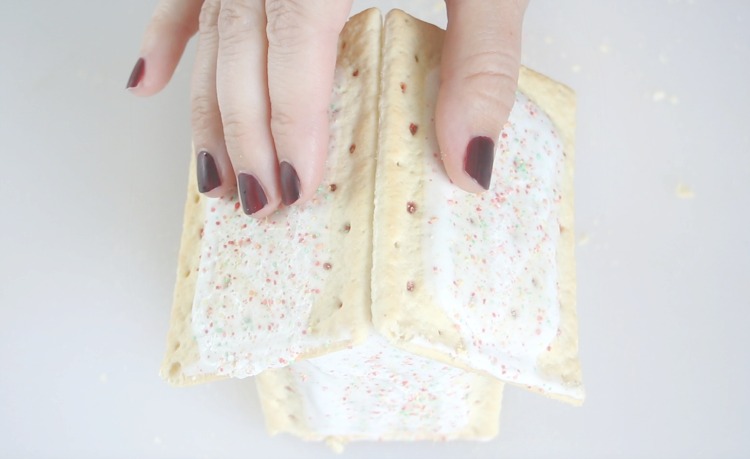
    • Cut on a diagonal from the corner of the pop tart that it on its side, to the center of the middle pop tart. Repeat on the other side.
      pop tarts being cut with serrated knife
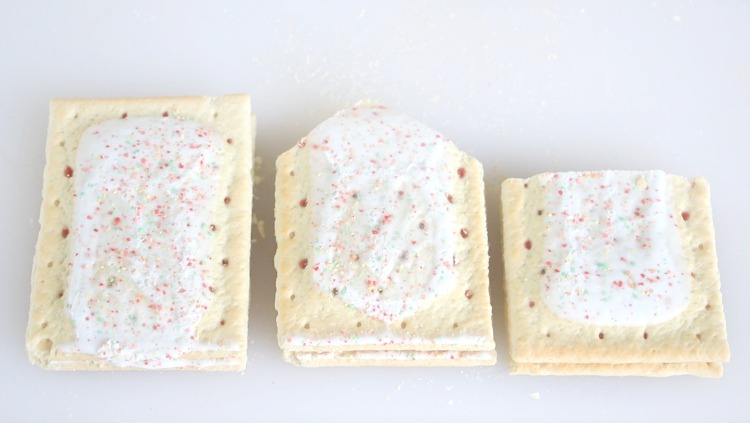
    • You should now have a pop tart that looks like a house. Repeat this step so that you have 2 house-shaped pop tarts.

    Side Walls

    • Remember that pop tart that you turned on its side? Go ahead and stand it up again. Place it next to one of the house-shaped pop tarts, lining up the corners, and cut horizontally across. Repeat.
    • You should now have two roof pieces (un-cut), 2 house-shaped pieces, and 2 wall pieces. 
      pop tarts cut into gingerbread house shapes
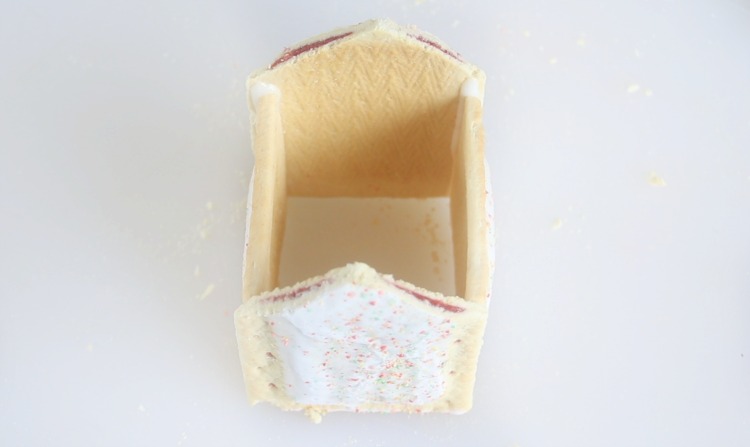
    • Combine powdered sugar and water to make a royal icing glue. Add water 1/2 teaspoon at a time until desired consistency is achieved (2 1/2 teaspoons works well for me). Spoon icing into a Ziploc bag and cut the tip off. Glue the 4 walls together with icing and hold in place for 30-45 seconds.
      pop tarts held together with royal icing
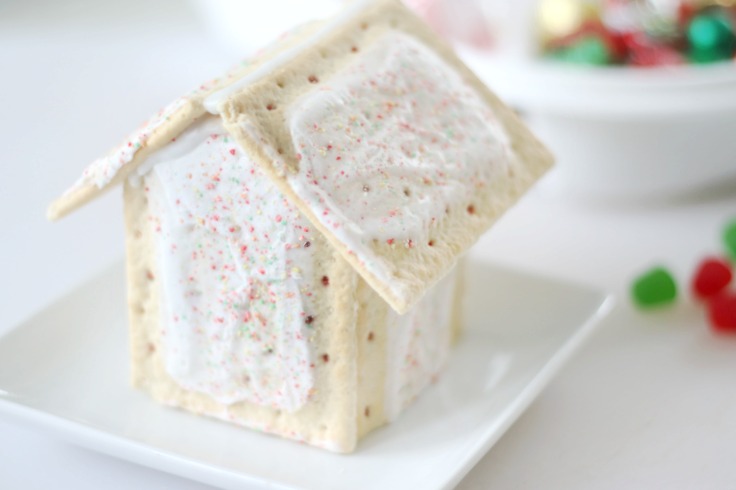
    • Add the roof pieces and hold in place for 30-45 seconds.
    • Let houses stand 15-20 minutes before decorating.
      pop tarts frosted together to look like a house
    • Dip decorations into icing or pipe icing onto houses to decorate.
      pop tart house with candy and frosting

    NOTES

    • Icing should be the consistency of craft glue.
    • When cutting pop tarts, use a serrated knife and gently saw. Don't press down hard with the knife.
    • To add heavier candies to the houses, like M&Ms, add a line of icing to the house and let the icing stand for a couple of minutes before placing the candy on it. This will allow the icing to dry a little and become tacky. 
    • You may need to hold the candy in place, or readjust the candy that starts to move as you wait for the icing to dry.

    NUTRITION

Thursday, October 1, 2020

Zucchini Banana Bread

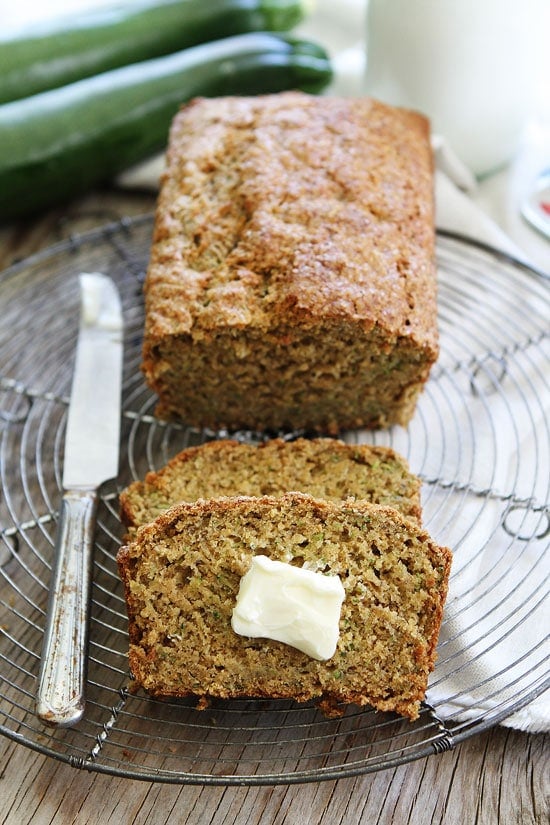
Zucchini Banana Bread Recipe


Prep Time

15 minutes
Total Time1 hour 15 minutes
Servings1 loaf

Ingredients

  • 1 1/2 cups white whole wheat flour
  • 3/4 teaspoon baking powder
  • 3/4 teaspoon baking soda
  • 1/2 teaspoon salt
  • 1 teaspoon ground cinnamon
  • 2 medium ripe bananas mashed (about 1 cup)
  • 1/4 cup granulated sugar
  • 1/4 cup packed light brown sugar
  • 1 large egg
  • 1/3 cup melted coconut oil cooled to room temperature (or canola or vegetable oil)
  • 1 teaspoon vanilla extract
  • 3/4 cup shredded zucchini
  • 2 tablespoons turbinado sugar optional

Instructions

  1. Preheat oven to 350 degrees F. Grease a 8x4-inch loaf pan and set aside.
  2. In a medium bowl, whisk together the flour, baking powder, baking soda, salt, and cinnamon. Set aside.
  3. In a large bowl, combine mashed bananas, granulated sugar, brown sugar, egg, coconut oil, and vanilla. Stir until well combined. Add the flour mixture and stir gently with a rubber spatula until flour is mixed in. Squeeze the zucchini in a paper towel to remove excess liquid. Fold the zucchini into batter.
  4. Pour the batter into prepared loaf pan. Sprinkle top with turbinado sugar, if using. Bake until a toothpick inserted into the center comes out clean, 55-60 minutes. Cool on a wire rack for 15 minutes, then remove the bread from the pan and place on wire rack to cool completely before slicing.
  5. Note-you can use all-purpose flour or regular whole wheat flour instead of white whole wheat flour. Store the bread covered with plastic wrap on the counter for up to 3 days. This bread also freezes well. Wrap in plastic wrap and a freezer bag and freeze for up to one month. Defrost before slicing. If you want to make muffins, line a muffin pan with muffin liners or grease cups. Bake for 20 minutes or until a toothpick comes out clean when inserted into the center. Will make 12 muffins.

Fruit plate


Thursday, September 10, 2020

BASIL PASTA WITH SAUSAGE AND FIRE ROASTED TOMATOES 🍝


Spaghetti with homemade tomato sauce - Choosing Chia


INGREDIENTS:
*1/2 pound of dry spaghetti, cooked (or your favorite pasta)

*1 pound regular sausage, cooked and crumbled

*1/2 of an onion, diced (or use 3 Tablespoons dehydrated minced onions)
*1 clove garlic, minced
*2 cups chicken broth
*2 Tablespoons cornstarch
*1, 15 oz. can fire roasted diced tomatoes
*1 cup Parmesan cheese
*1 cup fresh basil, snipped into little pieces
.
.
.
.
DIRECTIONS:
1. In a large pan, cook sausage and onion together, stirring often, until onion is soft, sausage is crumbled and browned and cooked all the way through. 
2. In a large pot, boil some water. When it comes to a boil, add a generous pinch of salt and add your pasta to the water. Stir so it doesn’t clump together. When pasta is al dente, turn off the heat and drain most of the water. 
3. Back to the sausage and onions- add the minced garlic, and cook on low for only a minute or two, being careful not to burn. (Garlic burns easily!) 4. Mix the cornstarch with the broth until completely dissolved, then add the broth mixture to the pan. Cook on medium high heat, stirring often, for a few minutes until sauce is thickened. Then add the can of tomatoes and stir.
5. Add the fresh grated Parmesan, and the chopped basil to the sauce. Stir.
6. Drain the pasta and add It to the pot that holds the sauce. Mix together, then garnish with the more basil and parm. Serve warm. Enjoy! 

Banana Bread Bars with Brown Butter Frosting

Banana Cake with Brown Butter Cream Cheese Frosting


  • Prep Time: 30 minutes
  •  
  • Cook Time: 25 minutes
  •  
  • Total Time: 3 hours, 55 minutes
  • Yield: serves 10-12

Want to serve the most impressive homemade dessert? This banana cake with brown butter cream cheese frosting is loved by all!


Ingredients

  • 3 large ripe bananas (about 1 and 1/2 cups mashed)
  • 3 cups (375gall-purpose flour (spoon & leveled)
  • 1 teaspoon baking powder
  • 1 teaspoon baking soda
  • 1 teaspoon ground cinnamon
  • 1/2 teaspoon salt
  • 3/4 cup (170gunsalted butter, softened to room temperature
  • 1 cup (200ggranulated sugar
  • 1/2 cup (100g) packed light or dark brown sugar
  • 3 large eggs, at room temperature
  • 2 teaspoons pure vanilla extract
  • 1 and 1/2 cups (360ml) buttermilk, at room temperature

BROWN BUTTER CREAM CHEESE FROSTING

  • 1/2 cup (115gunsalted butter, softened to room temperature
  • 1 and 1/2 8-ounce blocks (12 ounces) full-fat cream cheese, softened to room temperature
  • 4 cups (480gconfectioners’ sugar
  • 2 teaspoons pure vanilla extract
  • 1/2 teaspoon salt

Instructions

  1. Preheat the oven to 350°F (177°C) and grease three round 9×2 inch cake pans. Set aside.
  2. **Time-saving tip** Brown the butter in step 8 now, then place into the refrigerator to solidify as instructed below. This will save time when you’re ready to make the frosting.
  3. Make the cake: Mash the bananas. I usually just use my mixer for this! Set mashed bananas aside.
  4. Whisk the flour, baking powder, baking soda, cinnamon, and salt together. Set aside.
  5. Using a handheld or stand mixer fitted with a paddle attachment, beat the butter, granulated sugar, and brown sugar together on high speed until smooth and creamy, about 2 minutes. Scrape down the sides and up the bottom of the bowl with a rubber spatula as needed. Add the eggs and the vanilla. Beat on medium-high speed until combined, then beat in the mashed bananas. Scrape down the sides and up the bottom of the bowl as needed. With the mixer on low speed, add the dry ingredients in three additions alternating with the buttermilk and mixing each addition just until incorporated. Do not overmix. The batter will be slightly thick. A few lumps is OK.
  6. Divide batter evenly between 3 pans. Bake for 22-26 minutes. Baking times vary, so keep an eye on yours. The cakes are done when a toothpick inserted in the center comes out clean.
  7. Remove the cakes from the oven and set on a wire rack. Allow to cool completely in the pan.
  8. Make the frosting: Slice the butter up into pieces and place in a light-colored skillet. (Light colored helps you determine when the butter begins browning.) Melt the butter over medium heat, stirring occasionally. Once melted, the butter will begin to foam. Keep stirring occasionally. After 5-8 minutes, the butter will begin browning– you’ll notice lightly browned specks begin to form at the bottom of the pan and it will have a nutty aroma. See photo above for a visual. Once browned, remove from heat, and immediately pour into a heat-proof bowl. Refrigerate until solid.
  9. In a large bowl using a handheld or stand mixer fitted with a paddle or whisk attachment, beat the solid brown butter on high speed until creamed. Add the cream cheese and beat on high speed until combined, smooth, and creamy. Add 4 cups confectioners’ sugar, vanilla, and salt. Beat on low speed for 30 seconds, then switch to high speed and beat for 2 minutes. If you want the frosting a little thicker, add the extra 1/4 cup of confectioners sugar.
  10. Assemble and frost: Place 1 cake layer on your cake stand or serving plate. Evenly cover the top with frosting. Top with 2nd layer and evenly cover the top with frosting. Finish with the third cake layer and spread the remaining frosting all over the top and sides. Garnish with chopped nuts. Refrigerate for at least 30 minutes before slicing or else the cake may gently fall apart as you cut.
  11. Cover leftover cake tightly and store in the refrigerator for 5 days.

Notes

  1. Make Ahead Instructions: Prepare cake through step 7. Wrap the individual baked cake layers tightly and refrigerate for up to 2 days or freeze up to 3 months. Bring to room temperature, make the frosting, frost, and serve. Frosted cake freezes well, up to 3 months. Thaw overnight in the refrigerator, bring to room temperature or serve cold.
  2. Buttermilk: If you don’t have buttermilk, you can make a DIY sour milk substitute. Add 1 Tablespoon of white vinegar or lemon juice to a liquid measuring cup. Then add enough whole milk to the same measuring cup until it reaches 1 and 1/2 cups. (In a pinch, lower fat or nondairy milks work for this soured milk, but the cake won’t taste as moist or rich.) Stir it around and let sit for 5 minutes. The homemade “buttermilk” will be somewhat curdled and ready to use in the recipe.
  3. 9×13 Cake: Here is that recipe.
  4. Cupcakes: For about 2 dozen cupcakes, fill the cupcake liners halfway and bake for about 20-22 minutes. Same oven temperature.

Trader Joe’s coconut shrimp


Trader Joe's coconut shrimp tacos


Trader Joe’s coconut shrimp – in the frozen section

Corn or flour tortillas

Limes

Cruciferous Crunch Collection or Cabbage Slaw – found with other salad items near the produce

Green Goddess Salad Dressing – THE best!

Island Salsa

Directions:

Bake the coconut shrimp per the package instructions…takes 10-12 minutes.

Pour 1/2 the bag of the slaw into a bowl and toss with 1/3 of the bottle of the Green Goddess salad dressing and the juice from 1 lime.  Mix well.

Once the shrimp is done, remove tails and put in your tortillas.